Pages

Thursday, 29 November 2012

COPPER PIPE CHRISTMAS TREE


Yes, you can make a Christmas tree these days from anything!  This one I created a number of years ago.

Got myself a long piece of copper pipe, and a pipe cutter.  Yes, there is such a thing.  First I tried to cut it with a saw, no not gonna work......lol
All the tubes are hung but drilling a hole in the centre of all the pipes and threading a piece of copper wire.
That's it, done.

I planned this project out by doing all my measurements first, and then cutting.  You can pretty much make it any shape or size you like.   Like they say, measure twice, cut once.....oh I have done it the other way around so many times.  You know how it goes, so excited to just cut, and then do it wrong.

You can hang this "tree" just about anywhere if space is an issue.  Even if space isn't an issue.   I have hung it in many places just to show that it can work anywhere, in my opinion.

I have permanently hung it inside my front door.  Gives a nice touch to the door, I think.
What do you guys think?  Yay, or nay to the copper pipe tree?

Thanks for taking a look.


Hang it in front of a window.


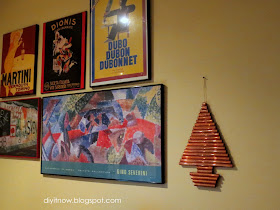
I hung it in my kitchen against my wall art.


This has been linked up to:
http://thefrugalgirls.com/2012/11/chic-and-crafty-party-1129.html


Monday, 26 November 2012

CHRISTMAS TREE NUMBER 1 DONE!

I have one Christmas tree done!  One more to go.
The next one will come in about a week and a half.  The natural tree.  My yearly fraser fir.

Every year we always get a gorgeous huge fraser fir for our kitchen/great room area for us to enjoy.
Last year, I wanted to do an artificial tree for my living room to enjoy when guests come over.

It is a slim 8 foot tree.

I used a silver and gold colour scheme.  I did not want to venture out that much from my other tree which is gold and red.  I wanted them both to relate to each other.

What do you think?

Here it is, ready for lights.


Almost done.  Forgot to add the ribbon, so I added it carefully at the end.....


Added some crystals from an old chandelier.


My tree topper!  Gold poinsettias and gold foliage.


This post has been linked up to:

http://www.homemadeginger.com/2012/11/ginger-jamboree-link-party-4.html

www.serenitynowblog.com


Sunday, 25 November 2012

MY SQUARE CHRISTMAS WREATH AND MY OUTDOOR DECOR

Who said a wreath has to be round.......

I really need to start decorating the outside of my front door and the entrance of my home, before time flies   and I have nothing done.  The Christmas season goes by so fast that before you know it, it is over.

I have had these old picture frames for some time now, just sitting in the garage collecting dust.  I never wanted to throw them out (and I love to get rid of stuff) as they were very good quality and there is something nostalgic about them.

I wanted something a little different to decorate my front door, and thought maybe these frames can come in handy.

I absolutely LOVE spray paint.  So fast and so easy to do.
Purchased a nice gold colour and went at it.  Hate the smell, so I always spray paint outside.

HERE ARE THE INSTRUCTIONS:

First get yourself some old picture frames.  You can find a wide range of frames from your local thrift store, in any size you like, and some of them are very ornate and great quality too.


Here are my frames ready for some spray paint.   Remember to dust them off.  Don't be like me, and get really excited about spray painting that you forget to clean them up.  Yup, I spray painted some dust.....lol


I too the frames behind the garage where there were many branches that were down from Hurricane Sandy.
I lay the frames on top and spray painted.  Actually, those branches are going to come in really handy when I do my outdoor Christmas decorating.

Stay tuned for that.


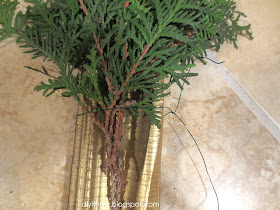
Gather up some greenery.   I used real cedar branches from my huge cedar trees in the back of my house, that are over 30 feet tall.

I put together 4 or 5 branches, and secured them with some wire.


Using some wire wrap them over the frame.

Continue in the same manner all the way around the frame.  I did the lower half only, as I wanted the frame to show through.

....and here it is hanging on my front door.

I added two little white feathered birds.


Found these very pretty green leaves, and I thought that I would do another picture frame wreath for indoors.


I hot glued them half way around the frame.

I am almost done.....keep watching for the final product and where I decide to hang it.  I still don't know yet where I am going to hang it but I will find a place.

Thanks for looking.
Have y'all started decorating?
Let me know if anyone tries this type of wreath; would love to see.


This post has been linked to:


http://www.savvysouthernstyle.net/


http://www.homemadeginger.com/2012/11/ginger-jamboree-link-party-4.html


http://www.shecookscraftsruns.net/


Tuesday, 13 November 2012

DECORATING MY STAIRCASE FOR CHRISTMAS

Well, I have started!
Excited to start decorating for Christmas.  I like to start early as the season is so short and I love to enjoy every second of it.

I have a very long staircase that I love to decorate every year.
This year I thought I would go for something different than your usual green garland.

I purchased some shimmery gold fabric, and some very wide burgundy velvet ribbon.  I swagged it from the top of the stairs all the way down.

I created a very large bow, and some smaller ones for the staircase.
Added some red stems to the middle and voila, my staircase is ready.

Now I am ready for my next decorating project.
What do you guys think?  Yay or nay to this staircase?

           Here is my staircase.  Ready for some decor.


And here it is.....

Used some beautiful gold fabric and wide velvet ribbon.


Some red branches in the middle.


Added some clear little reindeer going up the stairs.


I found these really neat hooks that grab onto the hand rail.

Put a nice little cozy on them....lol so not to scratch my handrail.


This post has been linked up to:

http://thededicatedhouse.blogspot.ca/2012/11/make-it-pretty-monday-week-24.html


http://www.savvysouthernstyle.net/


http://www.houseontheway.com/twirl-take-a-bow-party-14/