Thursday, 28 June 2012

DIY ART MASTERPIECES

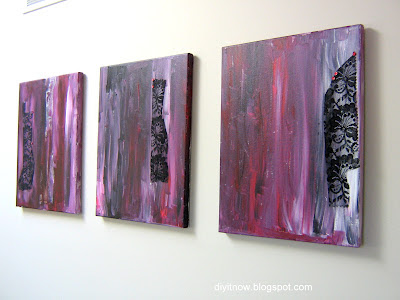
The landing on my second floor needed some art work, asap.  Purchased some stretched canvas and some acrylic paint and went to it.

Did not have any clue of what I wanted to paint, nor do I know how to paint.
I wanted to do some abstract work, (of course it would have to be abstract, as I have no talent when it comes to drawing).  
I mixed some colours together and started splattering them on.  There was some black lace nearby, and podged it on, after the paint was dry.

Name of the paintings;  Women and Fashion.  

Take a look.


My angel collection


ART FOR MY WALLS

I inherited some wonderful old art books about a year ago.  Very nice indeed, but lets face it, when do we pick up an art book and read it?   Me?, never......

So, I decided to rip some of the pages out and frame them.  Check them out.

 
Lots of choices here.


Decided to use black and white pics of old gothic churches.
I framed them on a frameless frame; Thought I would contrast the old churches with modern framing.
You can use matte board to glue the pic on, or if you want to save money like me, Steal a bristol board from the kids.....lol
I love to mix the old and the new.


Secured them with clips, and ready to hang.


Hung them on the sides of my fireplace.


Wednesday, 27 June 2012

Tiffany Inspired Bridal Shower

DIYed this bridal shower card box.  A series of boxes stacked with an opening.  Wrapped in fabric, with a "diamond ring" on it.  (Actually, the ring is a napkin holder)  Really looked great on top.

Check it out.


25th Anniversary Bouquet

This is a "bridal bouquet" for my sister in law, who celebrated her 25th anniversary.  She really loved taking pictures with it on her special day.

I used approx. 1 1/2 dozen white roses and some greenery.  I added some rhinestones in the center of the roses for a little added sparkle.

Really easy to do.


Tuesday, 26 June 2012

......and here they are.......

I spray painted them in silver.  Really easy to do.  Did them outside so, no fumes, or mess.

Reupholstered the seat, also really easy.  Your staple gun and your glue gun is your friend.

A NEW LIFE TO TWO FABULOUS CHAIRS


Take a look at these great chairs, that have had better days.  They certainly have great bones.  Cannot discard these.  Let's see what I can do with them.


Saturday, 23 June 2012

THIS YEARS FLOWERS FOR MY URNS


WALL ART

Need something for your wall that can say anything you want?  

This is really easy to make.

What you need:

Pieces of wood, any size you want.  
Podge glue
Paper to print letters on
Paint

Cut pieces of wood to any size you like.  Paint any colour you want.  Print letters from your computer in any font you like (I used different fonts in my arrangements, gives it some interest).  

Glue the letters onto the wood with the Podge and let dry.  You can add another coat of Podge glue.  This will help seal it.
Done.  Add some hooks on the back and presto, ready to hang.


MOSAIC TILING IN POWDER ROOM AND FIREPLACE

I updated my powder room using mosaic tiles.   The wall behind the sink was becoming ruined and decided to install mosaic tiles.

I loved them so much that I put them on the fireplace in the Great Room area of my home.

Take a look.


Thursday, 21 June 2012

LAMINATE FLOORING ON THE WALL, HUH?

Laminate flooring is not just for floors!  I needed to give our office space in the basement a "libraryish" feel, so I put some dark laminate flooring on the wall.  I love it.

What do you think?


A classic chair, updated

This chair is a classic, but I wanted to give it a bit of personality.
I re-upholstered it with a shimmery type fabric, and now sits in a small sitting area in our bedroom.
What do you think?


A penny for your thoughts

My daughters friend sent her these pennies that were pressed under train tracks, so we decided to make friendship bracelets with them.  Pretty cute!


My vintage coffee table turned bench

My grandmother gave this coffee table to my mom way back in  the 1960s, and when my mom was ready to trash it, I took it and gave it a new life.
I got myself a 4 inch piece of foam, where did I get it, in my travels I spotted an old couch that was being discarded, and I took the pillows from it.....lol  (always look for old sofas, foam is expensive....lol)

Added a piece of batting over the foam, and a piece of material that I had on hand, and stapled it all underneath, and voila, new bench that sits in my entrance.


Saturday, 2 June 2012

IT TOOK 3 YEARS, BUT I GOT IT DONE!

Yes, it took me a while, but finally got it done.   I sure learned a lot about construction.  Check it out, what do you think?


Just participated in a before and after at:
http://www.oneprojectcloser.com/2012-before-after-series/


My fancy tool belt


Here I am with my fancy tool belt.  I thought I would add a feminine touch to my tool belt.

When we renovated our home approx. 7 years ago, we never renovated the basement, so one day I asked myself, "now how difficult can it be to renovate this basement?"  Wow, the beauty of not knowing what you are getting into.....lol

So, I got a table saw as a gift from my aunt who felt sorry for me, when I told her that I was going to cut wood with a hand saw.

I wanted a space for my 2 girls to hang out in with their friends.  So, open concept with an area for them to watch TV, and basically lounge.

Here are some pictures of the process.