Tuesday, 24 July 2012

MY TEENAGER IS CRAFTING, AND BAKING

My teenager has been occupying her time crafting and baking.
Yes, she is quite the crafter and baker.

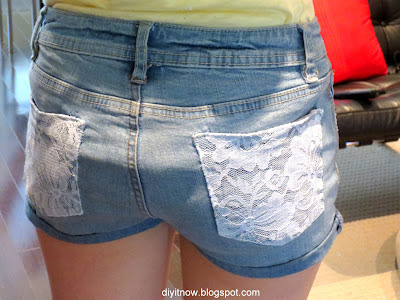
She decided to cut one of her old blue jeans and made them into shorts and added some lace.
Very cool!

Also, she has been very interested in perfecting her french dessert, macaron.  She did an excellent job on them.  Chocolate with raspberry filling.
Yum!

So excited to have posted this at a link party at:
http://www.funkyjunkinteriors.net/2012/08/sns-146-diy-link-party.html?utm_source=feedburner&utm_medium=feed&utm_campaign=Feed%3A+blogspot%2FKCcu+%28Funky+Junk


Here is the recipe for these delicious macarons.

http://www.christinamarsigliese.com/2011/03/double-chocolate-french-macarons.html


Thursday, 19 July 2012

THINKING CHRISTMAS IN JULY?

Christmas in July?  Yes, I saw Michael's has some stuff out already.

Start planning, so that when you see some things that are on sale that would fit your Christmas decor, just buy them.

My wreath last year.

Will be doing a tutorial on it, closer to Christmas.  I love the Christmas season.  Do you?


This post is part of Get Your Craft On at Todays Creative Blog

http://todayscreativeblog.net/

This post is part of a link party at House of Hepworths

http://www.houseofhepworths.com/2012/08/08/hookin-up-with-hoh-111/?utm_source=feedburner&utm_medium=twitter&utm_campaign=Feed%3A+HouseOfHepworths+%28House+of+Hepworths%29

This post is part of a link party at:


<div align="center"><a href="http://www.homestoriesatoz.com/" title="Home Stories A2Z" target="_blank"><img src="http://i916.photobucket.com/albums/ad2/bethcrabtree/tutorialsandtips.jpg" alt="Home Stories A2Z" style="border:none;" /></a></div>


Wednesday, 18 July 2012

SPECIAL OCCASION DIY

If you have any special party that you are planning, there are so many things that you can DIY yourself for a fraction of the cost.
This occasion was a little girl's christening, where I had the pleasure of doing a few things for her celebration.

Take a look.


These are some party favours that I wrapped.

I made the small little pouch out of white organza, which hold the little candy.
Cut a piece or organza whatever size you want them to be.  This one is 7 inches by 3 inches, folded in half
and the bottom and side edges are sewn with a straight stitch very close to the edge.


Turn pouch inside out, and press.  Fold top open corners to create a point, as shown below.


Fold over and press.


Prepare your candies and any beautiful ribbon you like.


Fill the pouch with the candy, and make a bow and hot glue it to the pouch.


This was a religious occasion, so I decided to put a little silver cross with some beads, and glued it on the bow.


Here they all are, ready to decorate the party favour.


Wrapped my box with a very pretty pink paper.


I purchased this wide roll of ribbon that looks like diamonds, and glitters.  I LOVE glitter....lol
You can cut it to any size you like.


Cut 1 inch strips and wrapped the box.


Here is the finished gift.  Love it. 


What do y'all think?
\


Sunday, 15 July 2012

SNAGGED ME THIS BABY! TRANSFORMATION SOON

This coffee table is going to take on a new life soon.   I am thinking of transforming it into a bench for the foot of our bed.

Stay tuned, coming soon.  What do you guys think?  What look should I give it?
Classic?  Modern?  Boutique Hotel? 


Saturday, 14 July 2012

YUP, WE ARE GOING TO LEARN HOW TO PUT ON A BUTTON

Yes, we all need to know how to put on a button.  


There are basically 2 types of button.  Ones with holes and ones with no holes....lol


The ones with no holes are called shank buttons.


It is a good idea to use button thread.  It is a thread that is thicker and stronger than regular sewing thread.  If you don't have button thread, then you can use regular sewing thread and triple the strands.


Insert your needle and pick up approx. 1/4 inch of material being careful not to go through to the other side of the jacket.  We don't want the inside to look messy.


Insert needle into hole of button, pull thread through and insert again in the hole beside it.


Repeat this process a couple more times, and then do the same with the other set of holes.
When you are done, we are going to wind the thread around the button about 5 times.


Ok, almost done.  Insert your need, right through  the wound up threads that you just did, and cut off.   


Regarding the shank button, it is done exactly the same way, with all the steps as listed above, only you are working with the shank part of the button.


Sunday, 8 July 2012

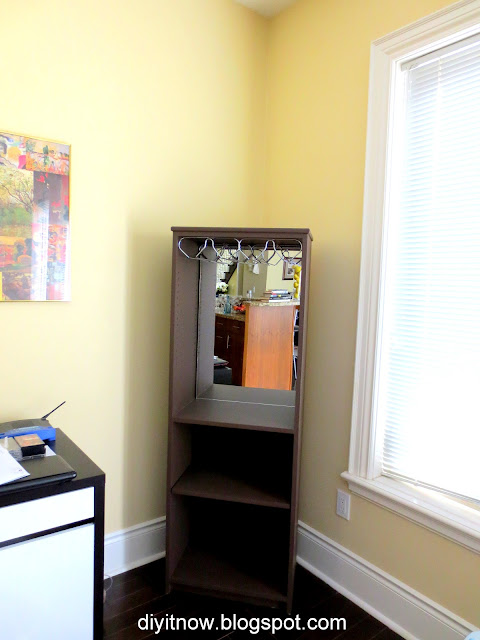
BOOK SHELF TURNED COCKTAIL BAR

I had an oak book shelf that was originally made for my daughters for their books when they were young.
I was really starting to hate that oak colour.  I started thinking of what else can this oak bookshelf become?
Already served it's purpose as a book shelf, now it was going to become, A COCKTAIL BAR.


Here is an example of what the shelf looked like before


I sanded the shelf, as it was sealed with some type of shiny finish, then primed it.
I used a semigloss brown paint for the whole shelf.  Removed some of the shelves, to suit my new bar.
I also added a mirror to the back, to give it more light and create reflection.


Purchased a wine glass rack and installed it to the top shelf.


Added the most important part, the booze....lol and there you have it.  My new bar.  Ready for a drink?


Thursday, 5 July 2012

REPAIRING YOUR PATIO SCREEN

Now this is a real easy project to do.  No joke.  Really.  Easy peasy....

There was this hole that progressively got bigger and bigger in my patio screen door, for over 3 years.
I have stuck my fingers in it, seen bugs come in for a visit.....lol  So I decided it was time.  Just don't do it when it's 100 degrees out.

You should remove the door frame in order to make your job easier, but I was having a hard time and I did not want to ruin the frame, so I decided to work with it in place.

Here is the hole.


                                You can purchase this screen repair kit at any hardware store.


                                                    First, remove both handles, the inside 
                                                          and the outside.
                                                            

Next you need to remove the screen and the inside rubber thingy, yeah that's what I called it until I learned that it is called a spline.....lol  Just pry it at the corner and pull, pull, pull.  Remove the screen and discard.


Roll the screen out and because I did not remove the door frame, I would suggest that you use tape to 
temporarily hold it in place.


                             This is the tool that is in the kit that you use to install the screen.
                                               Sort of like a little pizza cutter.


Start at one corner and push the spine in place with your tool.  Continue on one side and then do the opposite side, and then finish off by doing the other 2 sides. 

              When all sides are complete, you trim the screen using a blade knife close to the edge.


                                                        Put both handles back on. 


                                                                Here it is, new screen.

Monday, 2 July 2012

SPICE UP YOUR CANDELABRA

Does your candelabra look, well just, plain?  Want to add some glam to it?  Then go to it.
Here is my plain candelabra; nice but needs some sparkle.


Remove the bottom plates.  You will need to purchase a very thin drill bit that is used for metal  Carefully drill holes in.  I drilled 4 holes in each plate.  I also drilled holes in the arms of the candelabra.


Purchase some crystal beads, or you can even use acrylic beads in any shape you like.
I removed mine from an old chandelier, that had real crystals.  Nothing sparkles like the real thing.


Hang the beads, and presto; new looking candelabra with sparkle.


Sunday, 1 July 2012

MORE DIY ART FOR YOUR WALLS

It is endless what you can put on your walls, or your floors........yup art on the floor.......

Take a look


Some more art around the house
Take a look


This is a DIY art project that anyone can do.  These are pictures taken out of an art book, and glued together.  The top part is the book cover.  So now you have the title of the book and who the artist is.
Pretty cool.